
A Meta-Framework by Devs, for Devs

In 2023, 2 million people paid using Fintoc.
All those payments were made through the widget, the interface that allows you to connect to Fintoc and make a payment. To give you some context, this widget was created in early 2021, more than three years ago.

This widget started as an MVP for our payments product, but it ended up being the solution that kept us running for years.
It began as a standard frontend application with just a few lines of code and some Tailwind classes. While we made many visual and UX improvements for users paying with Fintoc, for a long time, we didn’t implement any architectural improvements.
We are a startup. The business keeps growing, and with that, the product has to evolve: a small change here, a new feature there, an if statement to quickly handle a special case, and another if statement because in one country, a particular flow works differently than in the others. And all of that starts to pile up.
What happened with our widget is similar to what happens when you organize your closet. You neatly fold your t-shirts, group them by color, and keep what you use the most within reach. But over time, that organization fades. Plus, you originally organized it in summer, but the weather is unpredictable, so when winter arrives (spoiler: much sooner than you think), your closet is so messy that you have nowhere to put your new warm clothes.
That, along with several other challenges (like bundling and route management), led us to make a tough decision: we needed to rewrite the entire application.
And not only did we rewrite it, but we also built a meta-framework specifically designed to power our widget and streamline development for our entire team.
This is the story of redemption and learning that we experienced as a team when it was time to pull a Marie Kondo and say enough to the messy closet that was our widget’s code.
The Fintoc Widget
Originally, our widget was written as a standard SPA (Single Page Application). It made sense at the time because it handled a very simple user flow and was relatively small.
But as time went on, the flow became more and more complex.
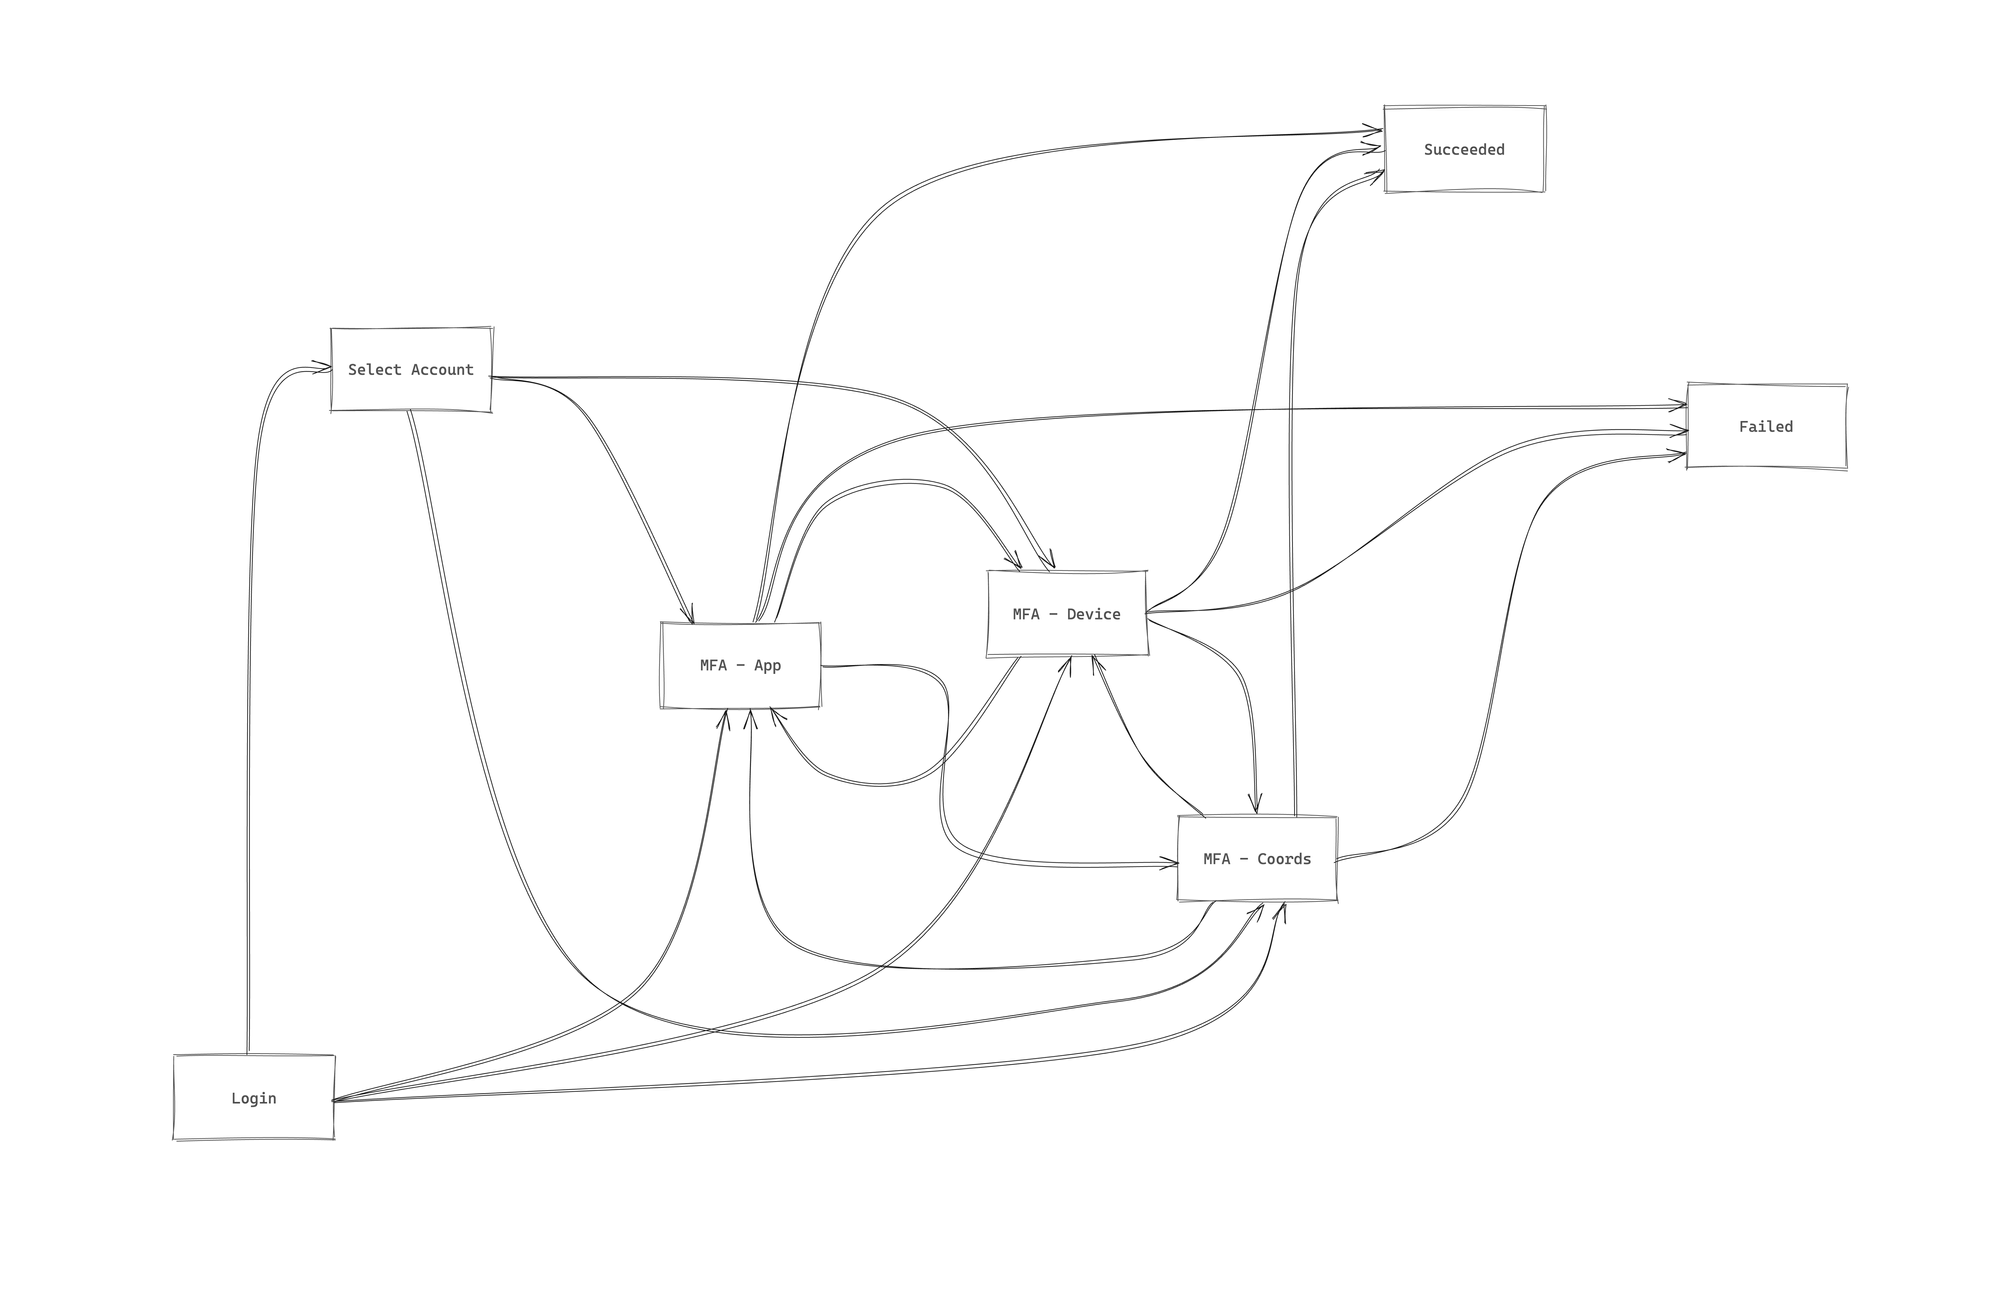
Even when simplifying the states and transitions to less than 10% of what actually exists, it’s clear that the flow has become incredibly complex. It’s even difficult to understand visually.
The way we were developing the widget didn’t adapt to the complexity of the problem or the number of developers working on it. This led to major difficulties when adding new features or modifying existing code.
That, along with other foundational issues—such as high initial download times, lack of static typing, complexity in testing, among others—led us to the difficult decision to redesign the project.
Our Own Meta-Framework
One major lesson from our initial widget version was that the developers working on the project are not always frontend experts.
Our solution needed to include some clever tricks to solve our biggest challenges (reducing load times, enforcing strict typing, etc.), but these ✨ magic tricks ✨ had to be completely invisible and automatic so that developers without deep frontend knowledge couldn’t make mistakes, like:
- Introducing loose types (e.g., using
stringwhere only'primary' | 'secondary'should be allowed). - Increasing load times without realizing it.
As I built tools for the rest of the dev team, the repository started looking more like a framework than a regular project.
Another key goal was ensuring that our code was highly testable, could handle changes without constant refactors, and remained easy to understand at a high level.
The solution to these challenges was building around a state machine.
State Machines (and the Actor Model)
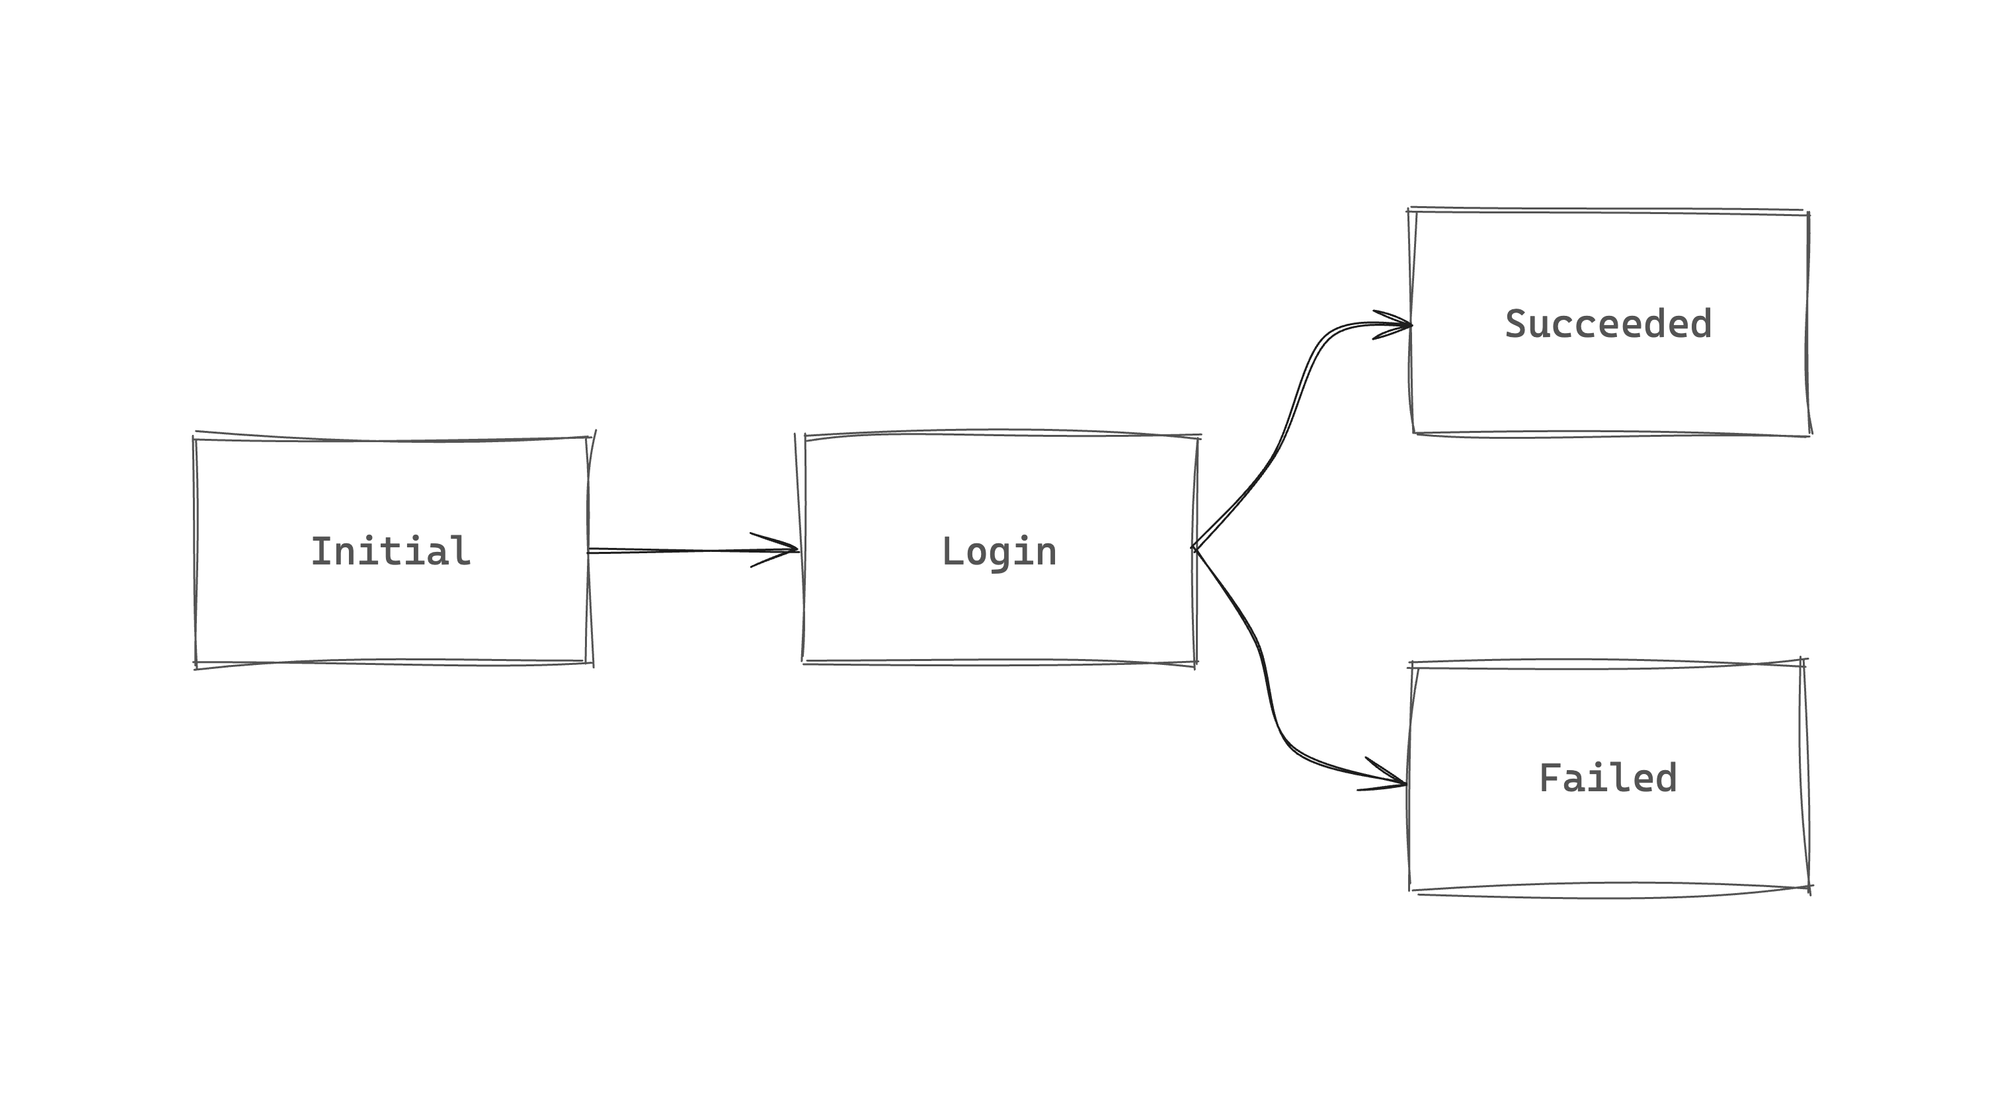
A payment flow can be perfectly represented by a flowchart. In fact, we already use these diagrams to understand the paths our users take. So why not program using a flowchart as well?
Simply put, a
state machine
is a blueprint for defining possible states and their transitions.
An actor is a "living" process that can emit, receive, and react to events. Each actor has a current state and context, which it can modify depending on the events it receives.
The actor uses a state machine to determine how to transition from one state to another based on the events it processes.
At Fintoc, each country/product combination has its own state machine. When the widget is opened, it selects a state machine to execute and starts an actor to handle the payment flow, running the chosen state machine. To model our state machines, we use xstate, a popular JavaScript library.
This structure brought us several benefits:
- All widget logic is contained within the state machine. The presentation layer (or views) only displays data from the actor’s context and emits events (user input). The actor decides what to do with the input—not the components. This means the entire payment flow can be executed without rendering a single pixel. Events could even be sent to the actor through a different mechanism, such as programmatically emitting events instead of relying on the UI. Essentially, the actor’s logic is 100% decoupled from the UI.
- Since the UI is separated from the logic, testing the logic is extremely simple. And because the logic is self-contained, it can be easily mocked to test UI behavior in isolation, while both parts can be run together for integration tests.
- Since the actor makes all decisions, we can leverage the state machine structure to perform ✨ magic ✨ such as automatically managing views, prefetching assets needed for future screens, and other optimizations.
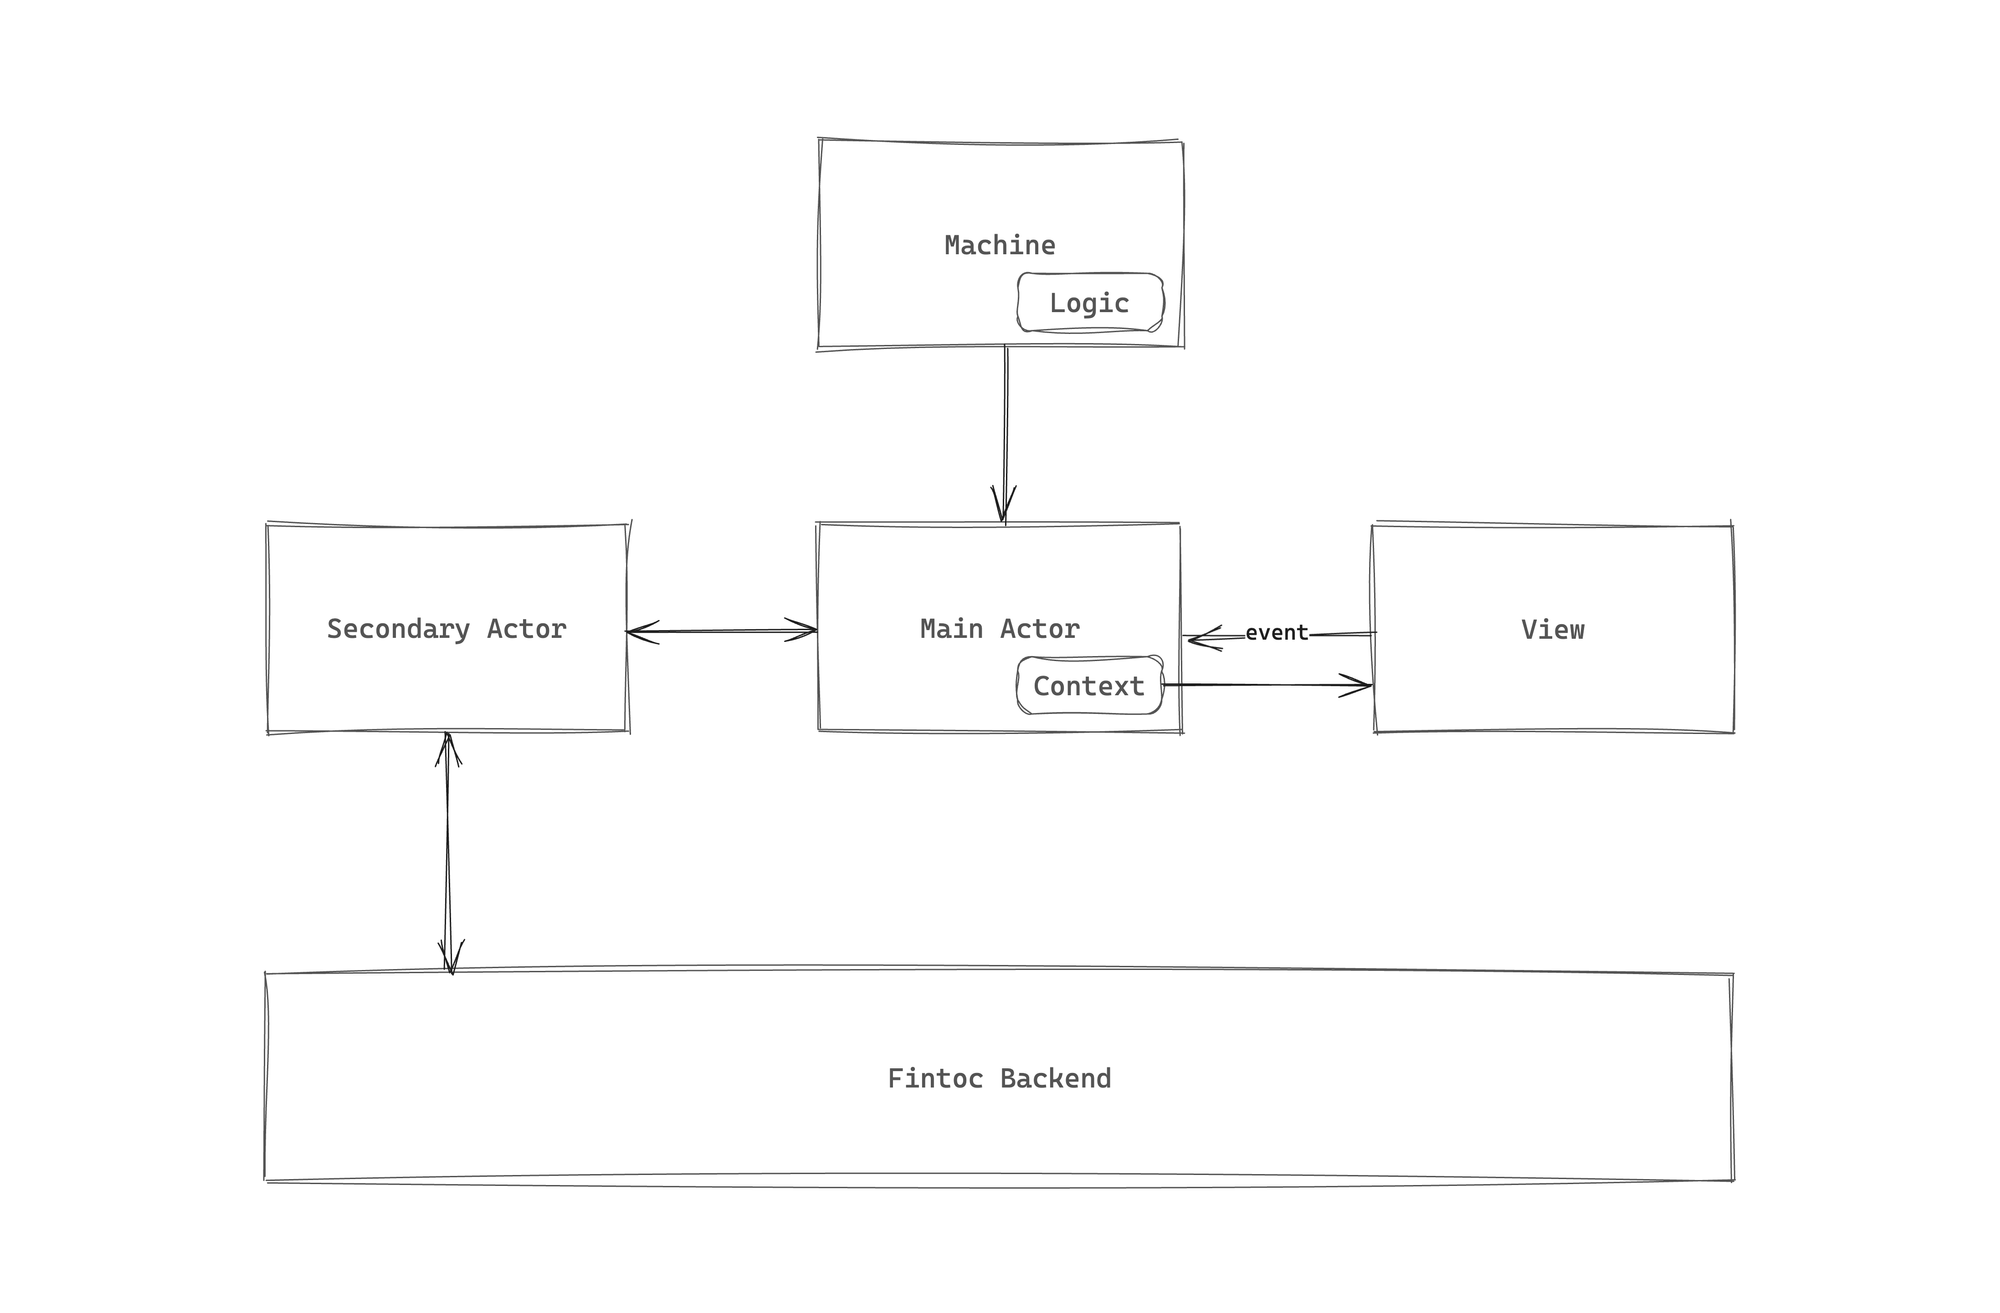
In the image, the Secondary Actor is a second actor that does not execute the main flow of the diagram but instead handles asynchronous tasks (such as backend calls). This actor's state machine models a promise. You can read more about the problem they solve here, but for the purposes of this post, they are not the main focus (even though they are crucial to the widget's functionality).
This design serves as the foundation of our meta-framework, enabling us to implement additional features that enhance the developer experience while ensuring the best possible payment experience in Fintoc.
Some of the key functionalities that emerged from this design include:
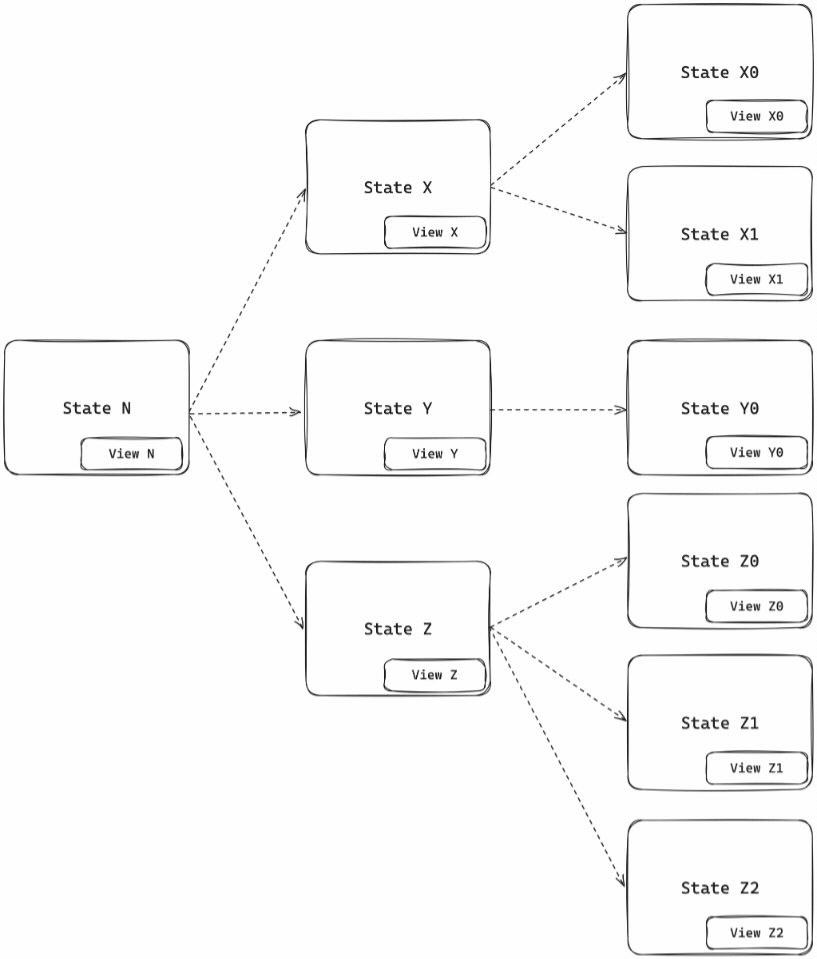
1. Automagic Routing
I didn’t want developers to manually handle routing (e.g., using router.push directly in the view in addition to emitting events to the actor). It was just another potential failure point and completely unnecessary, since views in our widget are always linked to states in the state machine. So, I designed a set of tools to automate this process.
Now, a view is declared within the routes simply by assigning a name. For example, using bank-selection:
// src/cl/payments/routes.ts

import type { RouteRecordSingleViewWithChildren } from 'vue-router';
import { generatePrefetchedRoute } from '@/shared/routes';
import { renderViewFactory } from '@/shared/views';

const NAMESPACE = 'cl/payments';

export const routes = {
  path: `/${NAMESPACE}`,
  component: () => import('./layout/Layout.vue'),
  children: [
    ...,
    generatePrefetchedRoute({ name: 'bank-selection', component: () => import('./modules/bank-selection/BankSelection.vue') }),
    ...,
  ],
} as const satisfies RouteRecordSingleViewWithChildren;

export type Route = typeof routes['children'][number]['name'];

export const renderView = renderViewFactory<typeof NAMESPACE, Route>(NAMESPACE);
It's important to note that this router is already set up. A developer adding a new feature only needs to add a line inside children, pointing to their view using generatePrefetchedRoute.
Then, the corresponding state is declared using the renderView tool:
// src/cl/payments/state-machine/index.ts

import { createMachine } from 'xstate';
import { renderView } from '@/cl/payments/routes';

export const machine = createMachine({
  states: {
    'bank-selection': {
      ...renderView('bank-selection'),
      // here goes the rest of the state definition
    },
  },
});
Now, when the actor enters the bank-selection state, the router will automagically render BankSelection.vue. If two consecutive states render the same view, that view won't be mounted twice. The developer doesn’t need to worry about how this happens—it just works.
Additionally, even though it's not visible in the snippet, the parameter received by renderView is automatically typed with all possible route names. This means developers get autocompletion in their IDE, and TypeScript ensures that non-existent views cannot be rendered.
.png)
2. View-Level Pre-Fetching
One of the biggest requirements for this project was that the widget had to open extremely fast. To achieve this, we needed to reduce the initial bundle size. Additionally, I wanted to ensure that developers never had to worry about increasing the widget's initial load time—this should be handled automatically.
What we did was separate each view into its own chunk using code splitting. This way, views (and the assets they use) don’t add weight to the initial widget download, meaning that adding assets to cl/payments won’t slow down mx/payments.
But if these assets aren’t downloaded initially, when do they get downloaded?
The widget automagically determines which views might be needed next and preloads them before they are required. The developer doesn’t need to worry about how this works. There’s not even a single line of code to show—it’s 100% automatic.
3. Dynamic Runtime, Static Typing
We have multiple possible state machines that the main actor can execute (e.g., cl/payments and mx/payments), and the machine is chosen dynamically at runtime.
The problem with this approach is that it makes strong typing difficult for anything that depends on the actor—since the actor could be executing the Chilean or Mexican state machine logic, there’s no way to determine that through type checking alone.
But there’s a hack.
Since our meta-framework manages views, it guarantees that Chilean views always execute an actor for the Chilean state machine, and the same applies to Mexico. So, we created a hook that returns the typed state and context for a specific country.
The hook is used the same way in both Chile and Mexico—it just returns different types depending on the country. Here’s an example:
<!-- src/cl/payments/modules/bank-selection/BankSelection.vue -->

<script setup lang="ts">
const { state, context, send } = useCurrentActor();

const login = (options: { username: string, password: string }) => {
 send('login-attempt', options);
}
</script>

<template>
  State {{ state }}, Context {{ context }}

  <BankSelectionForm @submit="login" />
</template>
The beauty of this approach is that the send function from useCurrentActor in cl/payments can only receive events for Chile (TypeScript will throw a compiler error if anything else is passed). Similarly, state can only correspond to states in the Chilean state machine, and context is typed as the context of the Chilean state machine.
Likewise, when using useCurrentActor in mx/payments, send, state, and context are typed specifically for the Mexican state machine—without the developer even needing to be aware that other country-specific state machines exist.
This Is Just the Beginning
Each of these tools and solutions in the widget came with several implementation challenges that I didn’t cover in this post, as well as interesting technology that I couldn’t fully dive into.
This is just the first part of a series of posts where I’ll go deeper into how we implemented some of these ✨ magic tricks ✨. For example:
- How we typed our routes and
useCurrentActor. - How we implemented prefetching under the hood.
- And more.
If you're interested in developer tools and how to simplify other devs’ work through software, you’d probably love working at Fintoc. I invite you to apply for one of our open positions. 🚀

.jpg)


.gif)
.gif)
.gif)


